Total Items: 0
Sub Total: $0.00

Lauren Clark // 03 Jun 2026
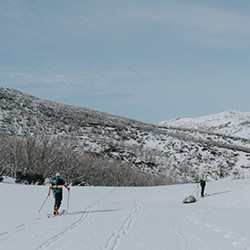
Wild Earth Gear Specialists and ambassadors share their top winter sleeping bags for alpine camping,...
Read More

Steph Devery // 02 Jun 2026
Planning the GR20 in Corsica? Wild Earth Ambassador Steph Devery shares her complete GR20 packing li...
Read More

Jess Fiske // 21 May 2026
Learn how to layer for winter with a base layer, fleece or mid-layer, insulated jacket and waterproo...
Read More

Lauren Clark // 20 May 2026
Washing down gear can feel risky, but it doesn’t have to be. Here’s how to clean down jackets, sleep...
Read More

Ben Southall // 19 May 2026
Before Sea to Summit was a gear brand, it was a human-powered Everest expedition. Here’s what Tim Ma...
Read More
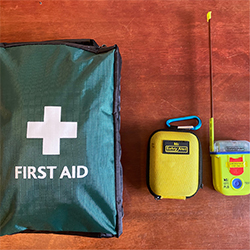
Steph Devery // 01 May 2026
A qualified paramedic shares her complete backcountry first aid kit checklist for hiking, bikepackin...
Read More

Wild Earth Staff // 16 Apr 2026
You don’t always need to take weeks off to have a real adventure. Some of the best micro-adventures ...
Read More
Ben Southall // 09 Apr 2026
Explore Kosciuszko's most iconic winter huts, from Seamans Hut to Tin Hut. Get safety advice, ge...
Read More

Anderson Moquiuti // 04 Apr 2026
Are you gearing up for an ultra race, like The Ultra-Trail Kosciuszko by UTMB, Ultra-Trail du Mont-B...
Read More

Lauren Clark // 28 Mar 2026
If you’ve ever searched ‘what is a PLB?’ and ended up more confused than when you started, this guid...
Read More

Lynne Martin // 20 Mar 2026
Planning the Camino de Santiago? I walked 900km on the Camino Francés to Santiago, then on to Finist...
Read More

Reid Marshall // 26 Feb 2026
This is the trip report, the hard-earned lessons, and the full packing guide of what worked, what di...
Read More

Lauren Clark // 26 Feb 2026
Duffel bags are a classic workhorse bag here in Australia for very good reason. They’re easy to pack...
Read More

Lauren Clark // 20 Feb 2026
You don’t need a passport (or a perfectly dialled kit) to find real adventure. Beau Miles’ best stor...
Read More

Wild Earth // 01 Feb 2026
Conquer Europe's toughest long-distance hike with our complete GR20 packing list. Based on a ful...
Read More

Lauren Clark // 30 Jan 2026
If you only upgrade a few pieces of kit this year, start here. These are the Gear of the Year 2025 w...
Read More

Lauren Clark // 16 Jan 2026
Ultralight backpacking is basically the art of minimalism on the trails. It's about bringing les...
Read More

Lauren Clark // 09 Jan 2026
Tom Turcich spent seven years walking 46,000 km across six continents, becoming the 10th person to w...
Read More

Lauren Clark // 30 Dec 2025
The best year ever doesn’t just happen; plan ahead with intention to make space for your adventures....
Read More

Hamish Lockett // 23 Dec 2025
If you’re planning a ski season in Japan this year and wondering what to pack, Hamish Lockett is her...
Read More


Using Afterpay you can pay for your order over 8 weeks. There's no interest or added fees* and nothing to pay today. Payment will be automatically taken from your debit or credit card in four equal payments each fortnight over 8 weeks, and you will receive your order immediately.
You simply need:
To use this service simply:
Approved AfterPay buyers will require the funds for the first payment to be available on their card at time of checkout, however the first payment won't be deducted for 14 days. First time AfterPay buyers will need to make the first instalment payment at the time of their purchase.
If you wish to return your goods you can choose to receive an exchange, or the Afterpay payment plan can be cancelled before the first payment at no charge. *If you fail to have sufficient funds available for AfterPay to automatically deduct payment on due instalment dates you will be charged a late fee of $10, and if the instalment payment remains overdue, an additional $7 will be charged one week later.
With AfterPay, there's no waiting and we'll ship out your order immediately as normal.
When you want to go now, sometimes it's handy to pay later. That's why, we offer interest free payment plans from two of Australia's favourite Buy now, Pay later services.